
서브스텐스페인터 신규 프로젝트 생성할 때 옵션에 관한 설명을 공홈에서 가져와 번역 했습니다.
다소 의역이 있을 수 있습니다.
Project Creation
The new project creation window allows to create a Substance Project to store the 3D mesh and its texturing.
Substance Painter creates a new Texture set per Material definition on the mesh you are importing.
This means you can import multiple meshes from a single file with overlapping UVs if you give them different materials.
새 프로젝트 생성 창에서는 3D 매쉬와 텍스처링을 저장할 Substance 프로젝트를 생성 할 수 있습니다.
Substance Painter는 가져 오는 메시의 재질 정의에 따라 새 텍스처 세트를 만듭니다.
즉, 서로 다른 재질을 지정하면 UV가 겹치는 단일 파일에서 여러 메시를 가져올 수 있습니다.
Creating a New Project
To create a new project click on File > New to create a new Substance Painter project.
Below is an explanation of all the parameter available in the New Project window.
새 프로젝트를 만들려면 파일> 새로 만들기를 클릭하여 새 Substance Painter 프로젝트를 만듭니다.
다음은 새 프로젝트 창에서 사용할 수있는 모든 매개 변수(설정옵션)에 대한 설명입니다.
Base Settings
| Parameter(변수) | Description(내용) |
| Template | Allows to specify a template that will defi ne the default settings of the project. A template contains the follow parameters: 프로젝트의 기본 템플릿을 지정할 수 있습니다. 템플릿은 다음 설정들을 포함 하고 있습니다.
템플릿은 File menu를 통해 기존 프로젝트에서 생성하고 Shelf 폴더에 저장하여 팀 구성원과 쉽게 공유 할 수있는 * .spt 파일입니다. |
| File | Click on the "Select" button to specify a mesh file to load. See below for a list of supported mesh file formats. "Select" 버튼을 클릭하여 로드할 메시 파일을 지정합니다. 지원되는 메시 파일 형식 목록은 아래를 참조하십시오.
|
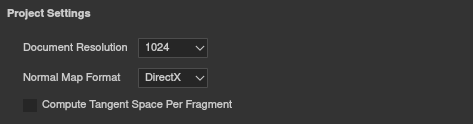
Project Settings
| Parameter | Description |
| Document Resolution |
Defines the default texture resolution of the project for each Texture Sets. The resolution can go up to 4K (4096x4096 pixels) when working inside the application and 8K (8192x8192 pixels) when exporting. The resolution can be changed at anytime later on via the Texture Set settings. 각 텍스처 세트에 대한 프로젝트의 기본 텍스처 해상도를 정의합니다. 해상도는 응용 프로그램 내부에서 작업 할 때 최대 4K (4096x4096 픽셀), 내보낼 때 8K (8192x8192 픽셀)까지 올라갈 수 있습니다. 해상도는 나중에 텍스처 세트 설정을 통해 언제든지 변경할 수 있습니다. 8K export requires at least 2.5GB of VRam on the GPU to be available. 8K 내보내기를 사용하려면 GPU에 최소 2.5GB의 VRam이 필요합니다. |
| Normal Map Format | Defines the Normal map format for the project, can be either 프로젝트의 노멀 맵 형식을 정의합니다.
|
| Compute Tangent Space per Fragment | If enabled, the Bitangents are computed in the fragment (pixel) shader instead of the vertex shader. This parameter impacts the way the Normal map is decoded by the Shader in the viewport. Changing this settings will require to rebake the Normal map. 활성화된 경우 Bitangent는 정점 셰이더 대신 조각 (픽셀) 셰이더에서 계산됩니다. 이 매개 변수는 뷰포트에서 셰이더가 노멀 맵을 디코딩하는 방식에 영향을 줍니다. 이 설정을 변경하면 노멀 맵을 다시 구워야 합니다. As a reminder:
자세한 내용은 Bakers 문서의 Tangent Space 페이지를 참조하십시오. |
UV Tile Settings (UDIMs)
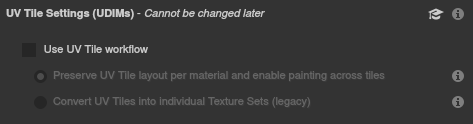
!)These settings cannot be modified once the project has been created.
프로젝트가 생성 된 후에는 이러한 설정을 수정할 수 없습니다.
| Parameter | Description |
| Use UV Tile workflow |
If checked, the imported mesh will be processed differently to allow painting outside the regular UV range (0-1). Project using UDIM should enable this setting. The processing of the mesh may differ depending on the setting. 선택하면 가져온 메시가 다르게 처리되어 일반 UV 범위 (0-1)를 벗어난 페인팅이 가능합니다. UDIM을 사용하는 프로젝트는 이 설정을 활성화 해야 합니다. 메쉬 처리는 설정에 따라 다를 수 있습니다. For more information, see the UV Tile documentation. 자세한 내용은 UV Tile 설명서를 참조하십시오. Possible values: 가능한 값 : |
| Preserve UV Tile layout per materials and enable painting across tiles 재료 별 UV 타일 레이아웃을 유지하고 타일 전체에 페인팅 가능 UV Tiles (UDIMs) are imported and grouped per material assignation on the mesh. This means a single Texture Set can contain multiple UV Tiles which are visible side by side in the 2D View. UV Tiles which are within the same Texture Set can be painted across seamlessly. UV 타일 (UDIM)은 메시의 재질 할당별로 가져와서 그룹화됩니다. 즉, 단일 텍스처 세트는 2D 뷰에서 나란히 보이는 여러 UV 타일을 포함 할 수 있습니다. 동일한 텍스처 세트 내에 있는 UV 타일을 매끄럽게 칠할 수 있습니다.  |
|
| Convert UV Tiles into individual Textures Sets (legacy) UV 타일을 개별 텍스처 세트로 변환 (레거시) UV Tiles (UDIMs) are separated into individual Texture Sets and renamed, ignoring any material assignation. Each UV Tiles is moved to the UV [0-1] range to be paintable. UV 타일 (UDIM)은 개별 텍스처 세트로 분리되고 이름이 바뀌어 재질 할당을 무시합니다. 각 UV 타일은 페인트 할 수 있도록 UV [0-1] 범위로 이동합니다.  |
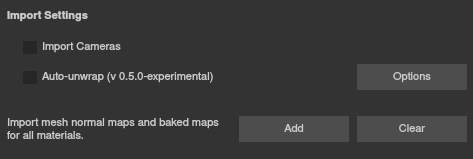
Import Settings
| Parameter | Description |
| Import Cameras | If cameras are present in the mesh file, they will be imported in the project and accessible as preset for visualization. 카메라가 메시 파일에 있는 경우 프로젝트에서 가져 와서 시각화를 위한 사전 설정으로 액세스 할 수 있습니다. Substance Painter doesn't support some cameras in certain conditions : Substance Painter는 특정 조건에서 일부 카메라를 지원하지 않습니다.
|
| Auto-unwrap | If enabled, missing UVs on the imported mesh will be generated. The processing may change depending on the settings selected via the Options button. 활성화된 경우 가져온 메시에 누락된 UV가 생성됩니다. Options(옵션) 버튼을 통해 선택한 설정에 따라 처리가 변경될 수 있습니다. For more information, see the Automatic UV Unwrapping documentation. 자세한 내용은 Automatic UV Unwrapping 문서를 참조하십시오. |
| Import mesh normal maps and baked maps for all the materials. | Use the Add button to loads texture files as Mesh maps and automatically assign them in the Texture Set settings. Add 버튼을 사용하여 텍스처 파일을 Mesh 맵으로 로드하고 텍스처 세트 설정에서 자동으로 할당합니다. See the section below for details on the naming convention to follow and an example. 따라야 할 명명 규칙과 예제에 대한 자세한 내용은 아래 섹션을 참조하십시오. |
Importing Mesh maps
It is possible to import mesh maps (baked texture specific to the mesh) and have them automatically assigned in the Texture Set Settings. To do so a specific naming convention must be followed. Mesh maps can be baked directly in Substance Painter or via Substance Designer.
메시 맵 (메쉬 전용 베이킹 텍스처)을 가져와 텍스처 세트 설정에서 자동으로 할당할 수 있습니다. 이렇게 하려면 특정 명명 규칙을 따라야 합니다. 메시 맵은 Substance Painter 또는 Substance Designer를 통해 직접 구울 수 있습니다.
Naming convention: TextureSetName_MeshMapName
Example: DefaultMaterial_ambient_occlusion.png
Bellow is a list of all the Mesh map names supported:
명명 규칙 : TextureSetName_MeshMapName
예 : DefaultMaterial_ambient_occlusion.png
ellow는 지원되는 모든 메시 맵 이름 목록입니다 :
| Mesh map | Filename convention |
| Ambient occlusion | ambient_occlusion |
| Curvature | curvature |
| Normal | normal_base |
| World Space Normal | world_space_normals |
| ID | id |
| Position | position |
| Thickness | thickness |
'3D, 그래픽, 프로그래밍 관련 > Substance Painter' 카테고리의 다른 글
| [Substance Painter]서브스텐스 페인터 기초-1 (1) | 2021.05.25 |
|---|
